
Shooting Portraits With Constant Light | Nanlite PavoSlim Review
- Jeff Carpenter
- Mar 14, 2024
- 5 min read
Scroll to the bottom of this post to see the youtube video review and breakdown of the PavoSlim 120C...
But I'd really appreciate it if you actually read the post 😜

I got turned on to Nanlite through their PavoTubes a few years back, and I recently got my hands on a couple of their new PavoSlim 120c panel lights. Coming from the world of flash, I never really put much thought into using constant light in a studio setting. That is of course until I tried out these PavoSlim 120c's. The main purpose of this blog post is to share my experience using these lights, and hopefully answer any questions you might have about them.
Variations of the PavoSlim
The PavoSlim has 2 main styles, one which is bi-color (B), and the other which is full color (C). Each of these have two different size options (60 and 120) the 60 is a 1x1 panel while the 120 is a 1x2 panel. I happen to have a couple of the 120c's so that is what I'll be talking about today.
PavoSlim 120c Unboxing
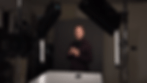
The Shoot
I had my friend Matthew in the studio a couple weeks back, and he needed some updated headshots for his business and LinkedIn. This was the perfect opportunity to test these lights out and see how they performed. My main goal was to see if these lights would be a viable option for my headshot business moving forward. Full disclaimer, I didn't just use the PavoSlims for this shoot. I also use a couple of the PavoTubes as well. We shot 3 main looks during this shoot, and one bonus look because I wanted to try out some of the color effects, and specifically the Gel mode that is included with the "C" variations of these lights.
Look 1
For the first look we just went with a pretty standard flat light headshot look with the two PavoSlims as my main lights in an upside down "V". Like most lights on the market these days, you can set each light to an individual channel. This came in very handy when I wanted to add a little bit of contrast to the image. Since I had each panel light on an independent channel, I was able to add contrast to the image by reducing the power of one light. This added more shadows to one side of his face, and gave a bit of a different look.
This first image has both of the main lights at the same power which creates a relatively flat light, and can also be seen in the catchlight in his eyes.

This image I turned down the power of the light to camera left which added a bit more contrast to the image because the right side of his face is more in shadow. You can also see that the catchlight on the left is a bit darker.

Look 2

This second look was a much more casual headshot. For the background, I used a Duo Board from V-flat world which required me to have a pretty tight crop. Aside from changing out the background, and slightly changing the angle of the fill light, I kept everything else pretty much the same. I did start to notice a bit of a hot spot on the right side of the background, so decided to bring in a grid which help flag the light a bit, and reduce the distraction on the background. The grids on the PavoSlim 120c's are really easy to use since then just fit onto the outside of the light. No velcro needed! these grids just slide right on, and the fit is really snug, so you won't need to worry about them falling off.

This image has a light hotspot in the upper right corner from the key light.

To reduce the hotspot, I added a grid to my key light which helped get rid of the glare, but also reduced the overall exposure.

For the final shot with this look, I increased the exposure to match the shot without the grid.

Look 3

The third look of the shoot was another pretty casual shot with very minimal adjustment of the lights. In the previous shots, I had my two PavoTubes pointed toward Matthew, and set to CCT mode which is a neutral color with adjustable color temperature. I had mine set to 5600K. To change up the look, I removed the DuoBoard background, and went back to the grey backdrop I used in the original shot. However, rather than having the lights creating rim light, I turned them about 45º toward the background and changed the mode to HSL which is the full color mode. This allowed me to create a colored background which gave us a completely different vibe from the previous shots.
This first image I had a pretty vibrant purple color on the background but decided for a different look on the second shot.

Ultimately, we decided on a much more neutral background with just a little bit of color.

Look 4
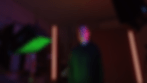
The final look was really more for me than it was for my client. I really wanted to try out the new Gel Mode which was included in the PavoSlim 120C. I also just love getting weird with color. Again, I kept the lighting all pretty simple but I did add an additional grid to the second PavoSlim to help control the light.

One feature that I really love about the PavoSlim C variations is "Gel Mode" in past Nanlite models, there was just HSL mode which allowed you to control the Hue, Saturation, and Luminance. This still gave you full control of the color spectrum, but as a photographer who was used to shooting with gels, I was eager to try out Gel Mode, which has a full gel library of Lee Filter gels. I could either control the gel from the power box or you can connect the Nanlite app which allows you to search for any color gel you want.
At the time of filming this video, I was still using the older version of the Nanlite app. They've since released a much more user friendly and robust app.

Check out the youtube review, and behind the scenes video from this photoshoot. To see the videos before they hit the blog, be sure to subscribe to the channel!
If you've made it this far down the page the means you at least read the first paragraph telling you to scroll to the bottom, but in all seriousness, I really appreciate you taking the time to check out my blogs and reviews. If there's anything in particular that you think I should do a video or a blog about, be sure to let me know over on the Next Level Workshops Forum If you haven't already joined, you'll get a FREE lighting guide when you sign up.
Also, be sure to check out some of my upcoming lighting workshops!
Until next time!
Jeff C.